Table of Contents
- Introduction
- System Requirements
- Installing CrossOver
- Debian-Based Installer
- Install From File Manager
- Install From Terminal
- RPM-Based Installer
- Install From File manager
- Install From Terminal
- Generic Shell Installer
- Install for a Single User
- Install for All Users
- Registering CrossOver
- Unlocking with Email and Password
- Unlocking from the Command Line
- Unlocking with an Activation Code
- Installing Windows Applications
- Listed Applications
- Install Details
- Editing Install Details
- Advanced Options
- Completing the Install
- Unlisted Applications
- Applications without installers
- Running Windows Applications
- Desktop
- Command Line
- Using wine --cx-app
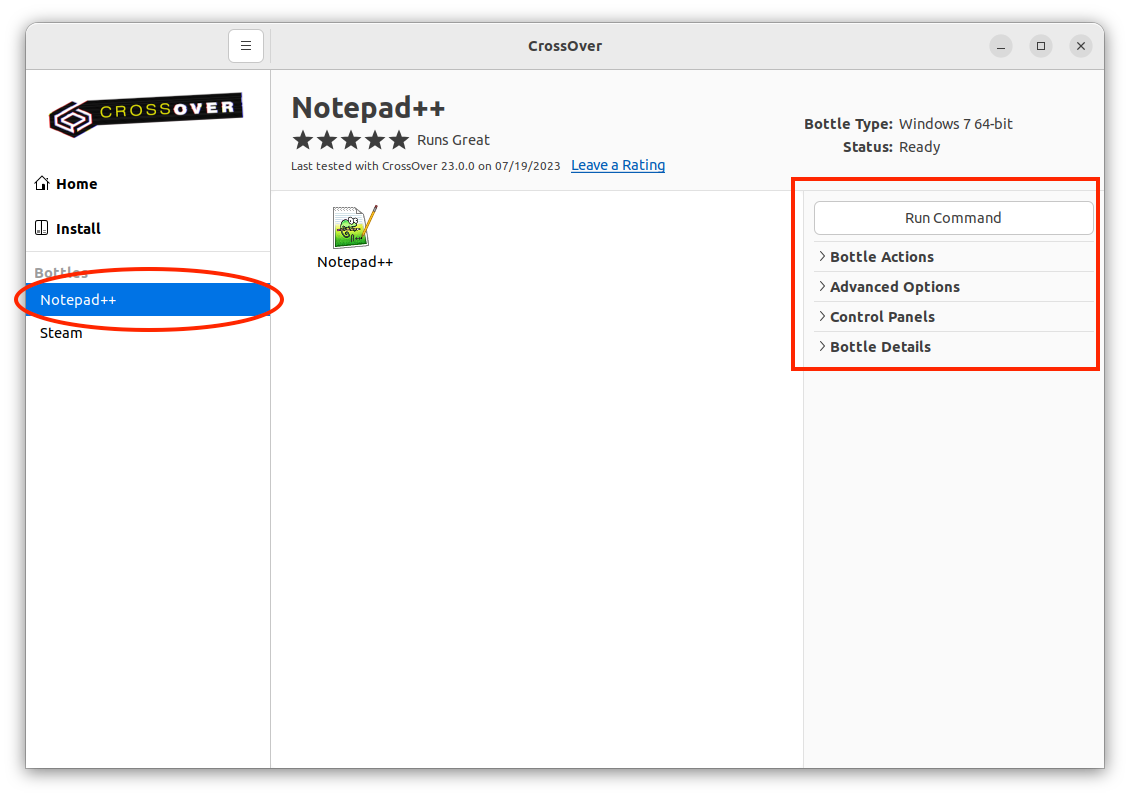
- Working with Bottles
- Bottle View
- Bottle Actions
- Advanced Options
- Control Panels
- Bottle Details
- Bottle Commands via Main Menu
- Preferences
- Online Integration
- Bottles
- Installer Assistant
- User Interface
- CrossOver Support
Introduction
CrossOver allows you to run Windows software on Linux. Because CrossOver integrates the applications with your desktop environment, games like World of Warcraft and Diablo II: Resurrected or productivity applications such as Quicken launch like any native program. It's as simple as a double-click.
System Requirements
- x86 compatible PC system
- Python 3.5 or later
- GTK 3.18 or later
- PyGObject 3.20 or later
- X.Org with XRender and GLX support
- 1 GB disk space (additional space required for Windows applications)
We test CrossOver on Ubuntu, Debian, Fedora, and Red Hat Enterprise Linux (RHEL), but design it to work on any Linux distro meeting the minimum system requirements.
Note: We can't guarantee compatibility if your Linux version is newer than your CrossOver version.
Installing CrossOver
The CrossOver installer is available in a Debian-based (.deb) format, RPM-based (.rpm) format, and a generic (.bin) format. The .deb and .rpm files install at the system level, while the .bin file can be installed at the system or user level. To download CrossOver, go to the CodeWeavers Website.
Debian-Based Installer
When using the .deb package, CrossOver installs at the system level, so all users have access to CrossOver. The CrossOver application installs in /opt/cxoffice and Windows applications in ~/.cxoffice. Use the .deb installer for Debian-based distros such as Ubuntu or Mint.
Install From File Manager
- Locate the
.debpackage in your file manager. - Double-click the
.debfile to install CrossOver.

Install From Terminal
- Open a Terminal session.
- Type
sudo apt updateand press Enter. - Change to the directory containing the CrossOver installer.
- Type
sudo apt install ./crossover_25.1.0-1.deband press Enter.
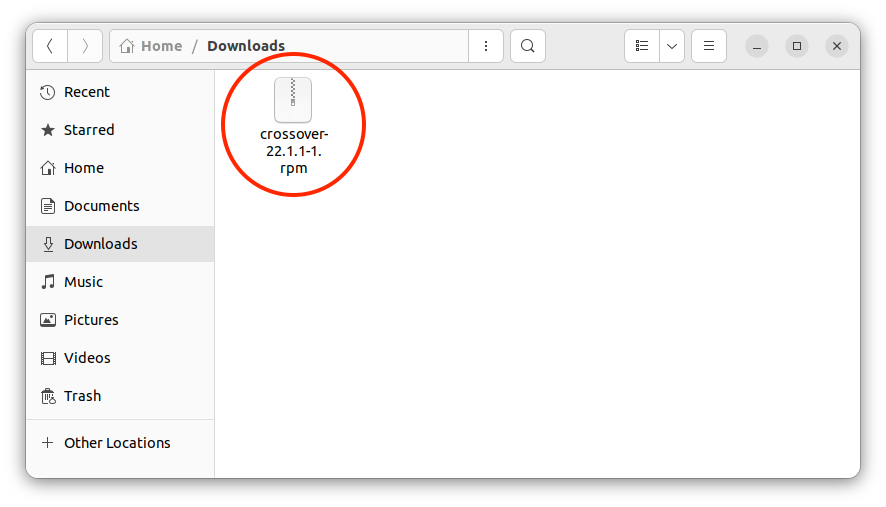
RPM-Based Installer
When using the .rpm package, CrossOver installs at the system level, so all users have access to CrossOver. The CrossOver application installs in /opt/cxoffice and Windows applications in ~/.cxoffice. Use the .rpm installer for RPM-based distros such as RHEL or Fedora.
Install From File manager
- Locate the
.rpmpackage in your file manager. - Right-click the
.rpmfile and choose Open With Software Install.
Install From Terminal
- Open a Terminal session.
- Type
sudo dnf updateand press Enter. - Change to the directory containing the CrossOver installer.
- Type
sudo dnf local install ./crossover-23.5.0-1.rpmand press Enter.
Generic Shell Installer
When you use the generic shell (.bin) installer, CrossOver can be installed at the system or user level. The generic .bin installer is compatible with various Linux distros. However, the installer does not automatically install dependencies.
Before you install CrossOver, we recommend making sure your system is up to date by following your distro's recommended update procedure.
Install for a Single User
When installed at the user level, only the user who installed CrossOver has access to install and run Windows software. CrossOver installs in ~/cxoffice, and Windows applications in ~/.cxoffice.
- Login as the desired user.
- Open a Terminal session.
- Change to the directory containing the CrossOver installer.
- Set the file to be executable by typing
chmod +x install-crossover-23.5.0.binand pressing Enter. - Type
./install-crossover-23.5.0.binand press Enter.
Install for All Users
When installed at the system level, all users on the system have access to install and run Windows software. CrossOver installs in /opt/cxoffice, and Windows applications in ~/.cxoffice.
- Open a Terminal session.
- Change to the directory containing the CrossOver installer.
- Set the file to be executable by typing
chmod +x install-crossover-23.5.0.binand pressing Enter. - Type
sudo ./install-crossover-23.5.0.binand press Enter.
Registering CrossOver
If you haven’t registered CrossOver it will start in trial mode. To continue using CrossOver in trial mode, click Try Now. The CrossOver trial has all the functionality of the full version. However, after 14 days, installed Windows applications are disabled. CrossOver periodically prompts you to register before the trial period ends.
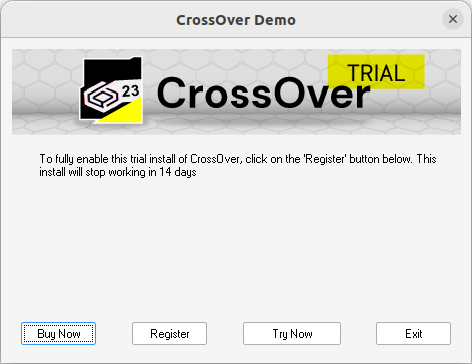
Clicking Buy Now opens the CodeWeavers store. If you have already purchased CrossOver, click Register.
Unlocking with Email and Password
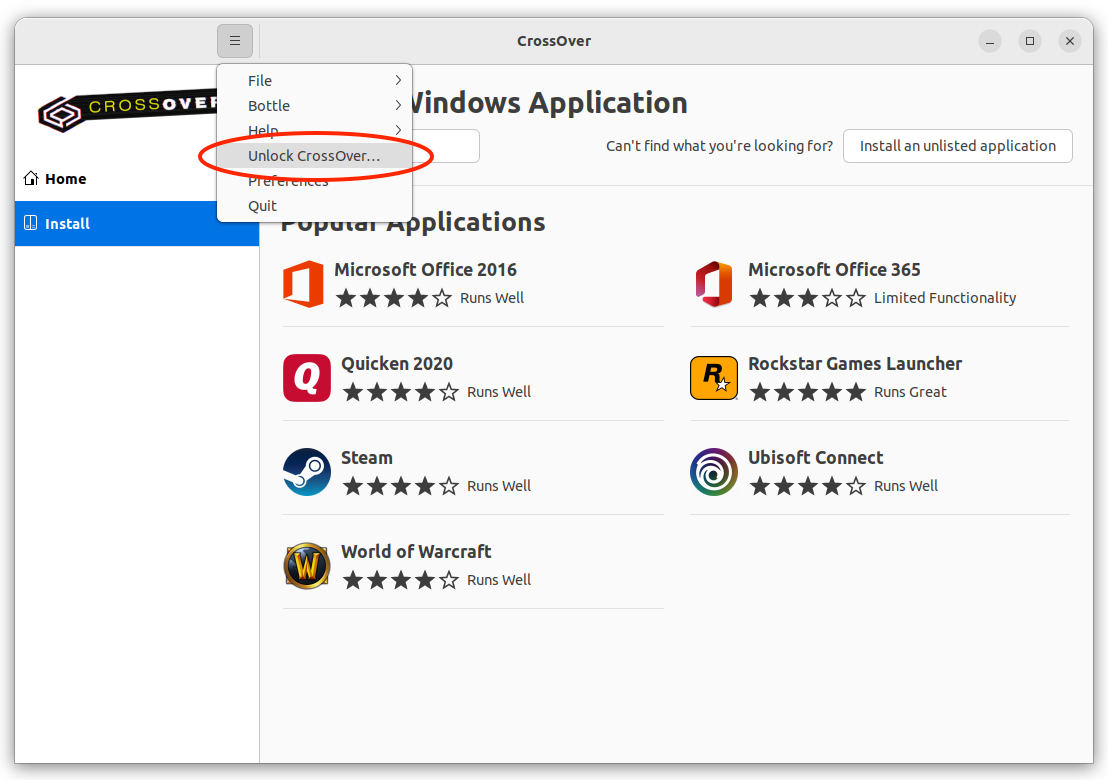
You can unlock CrossOver by going to the CrossOver main menu and selecting Unlock CrossOver.
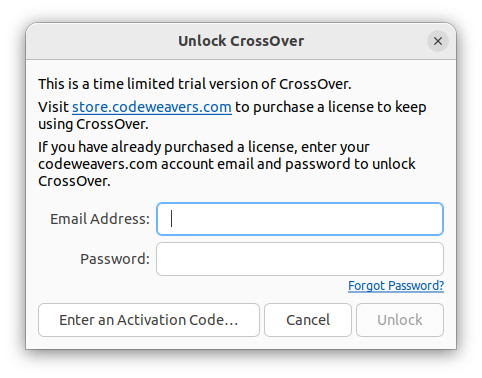
Enter the email address and password associated with your codeweavers.com account in the Unlock CrossOver dialog box and click Unlock.
Unlocking from the Command Line
To open the Unlock CrossOver dialog for a system-level install, use the following command:
$ sudo -H /opt/cxoffice/bin/cxregisterTo open the Unlock CrossOver dialog for a user-level install, use the following command:
$ sudo -H ~/cxoffice/bin/cxregisterUnlocking with an Activation Code
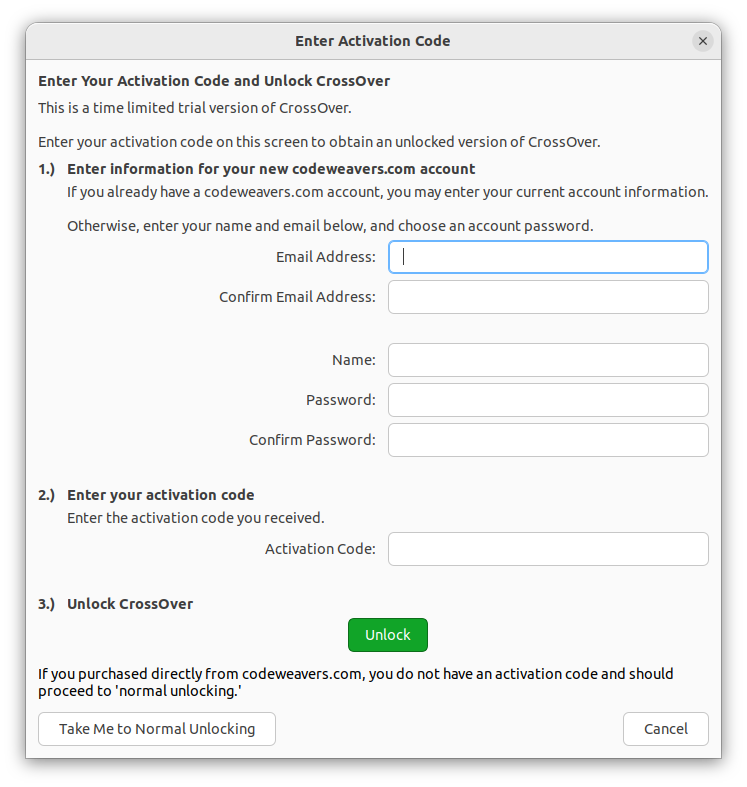
If you purchased CrossOver from codeweavers.com, an activation code is not needed to register.
However, if you bought CrossOver from a third party and received an activation code, click Enter an Activation Code on the Unlock CrossOver dialog box.
To complete the Enter Activation Code form you will need to enter either your existing codeweavers.com account information, or your email address and a new password to create a codeweavers.com account.
Installing Windows Applications
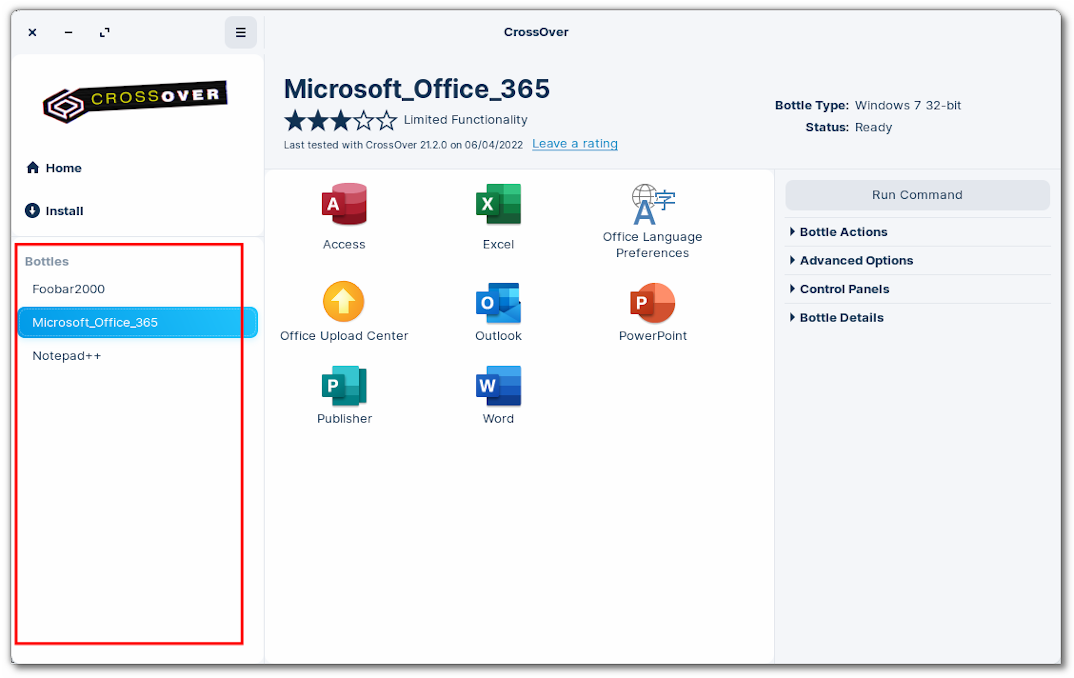
CrossOver installs Windows applications into bottles. A bottle is a virtual Windows environment (e.g., Windows 10 or Windows 11) with its own C: drive, fonts, registry, and software. You can install multiple programs into a bottle, but generally, CrossOver creates a new bottle for each application.
Keeping applications in separate bottles prevents them from interacting with or damaging one another. For instance, you could test out a new version of a particular program in one bottle while keeping your original one in another. Multiple bottles are also helpful whenever a specific application requires otherwise undesirable settings.
Applications generally fall into two categories:
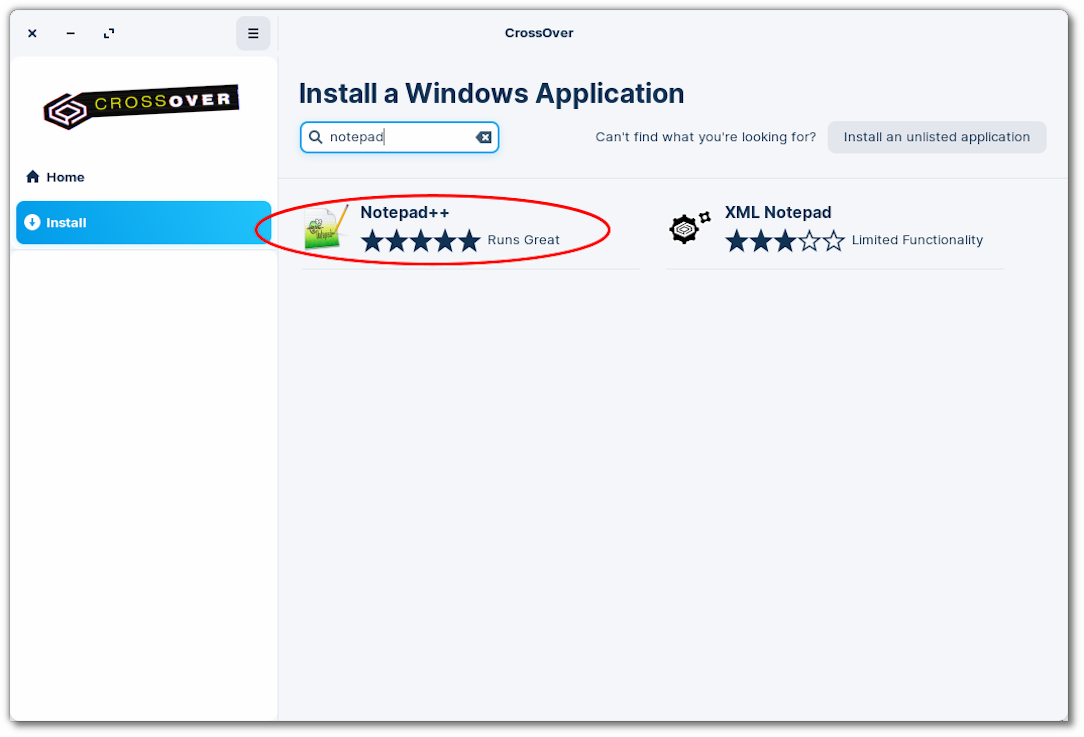
Listed — A listed application is an application that appears in CrossOver's application database. CrossOver determines as many install details as possible.
Unlisted — An unlisted application is an application that does not appear in CrossOver's application database. CrossOver does not default any install details for unlisted applications.
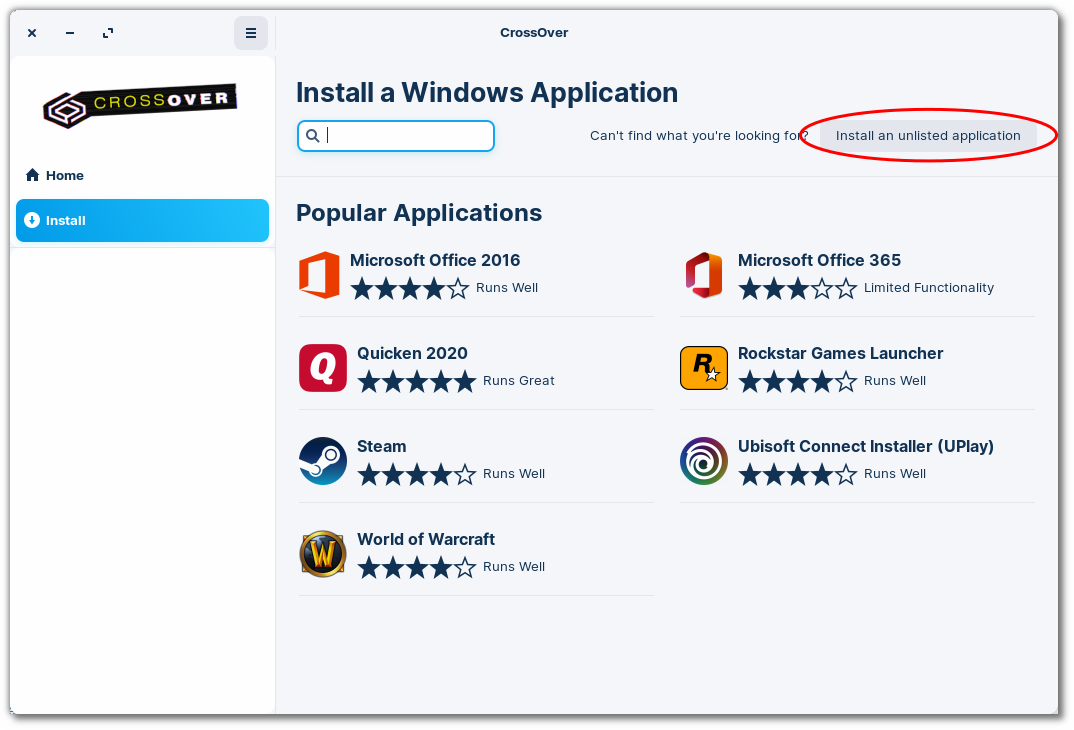
Listed Applications
- Type the application name in the search bar on the Install menu. CrossOver populates a list of applications matching the search criteria.
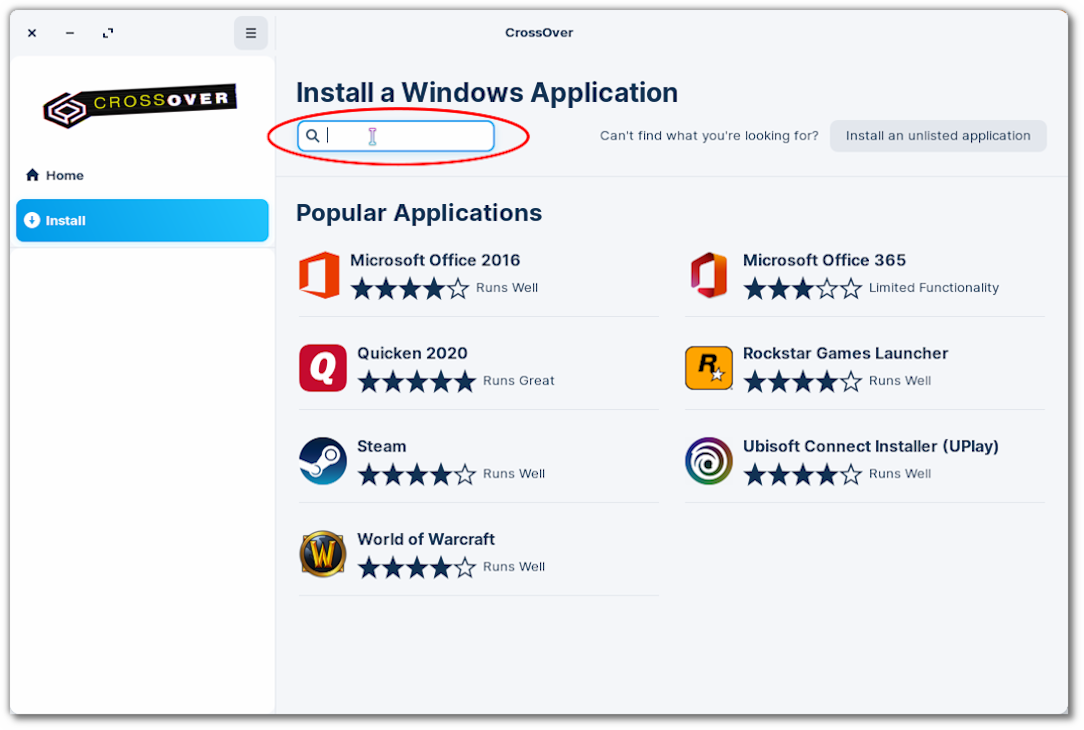
- Click the application's tile to proceed to the install details. If the application is not listed, see the next section on installing an unlisted application.
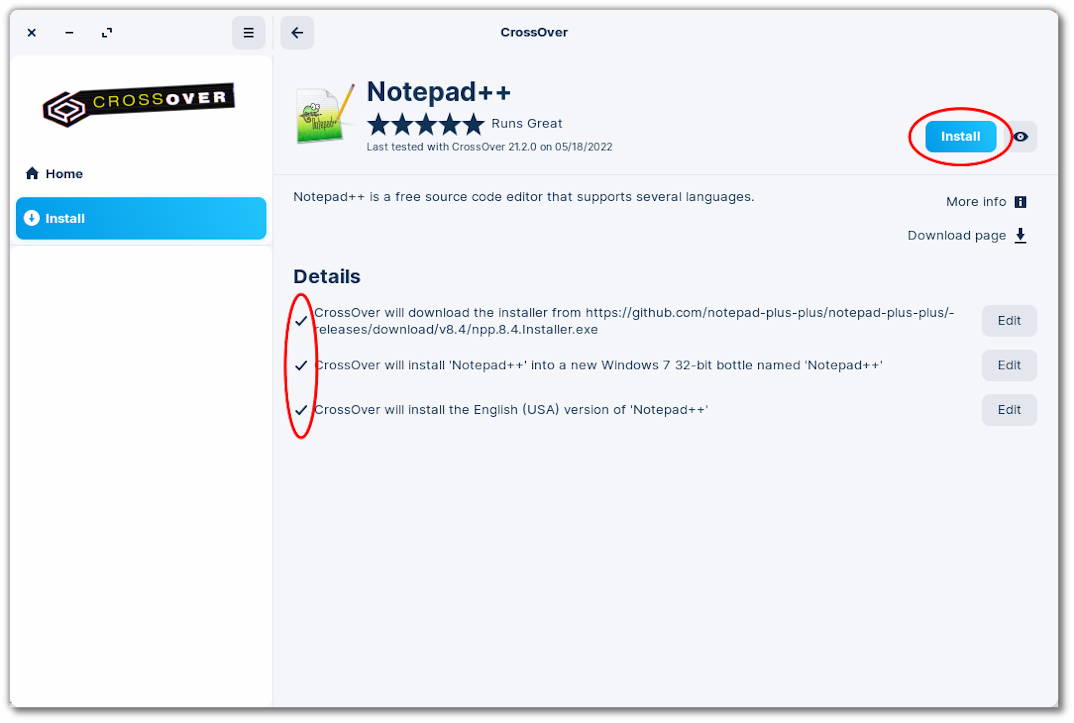
Install Details
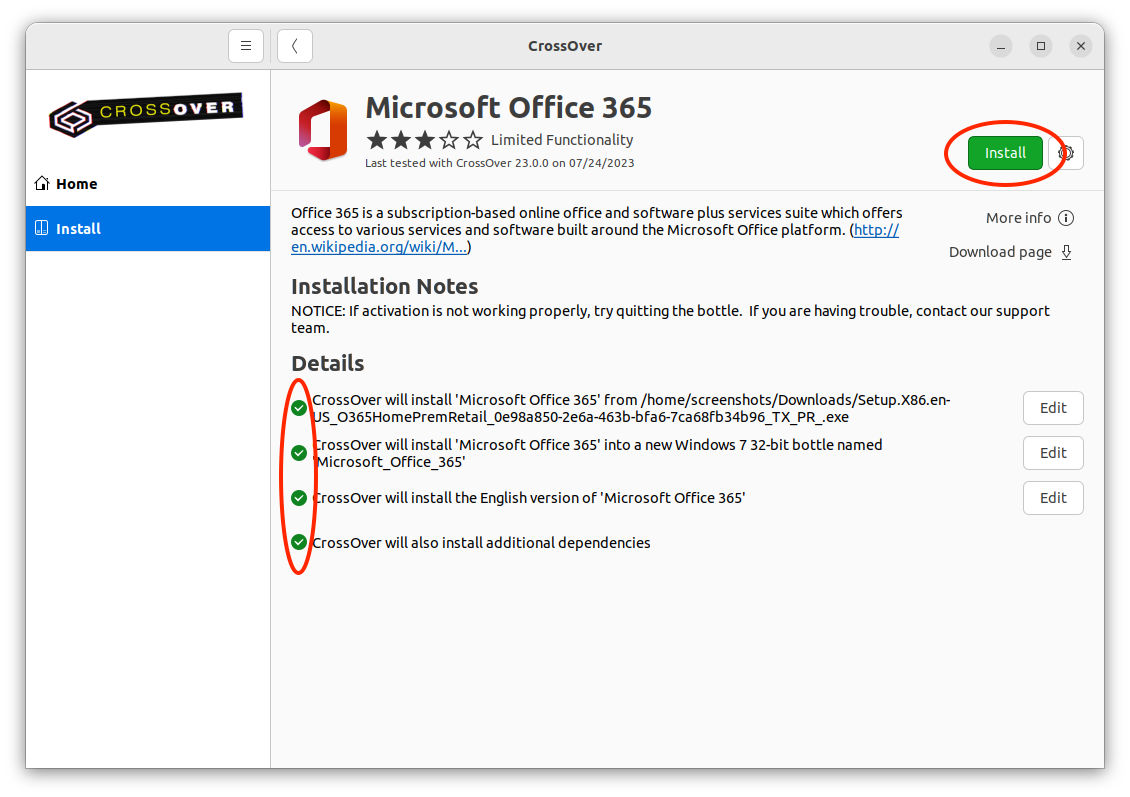
CrossOver automatically downloads the installer file and the required dependencies if an application is freely available on the internet. No further action is needed to configure your application once each install detail has a check mark. Click Install to proceed.
Editing Install Details
If CrossOver cannot obtain an installer file because it is unavailable for download or requires login credentials, you must provide the installer file location.
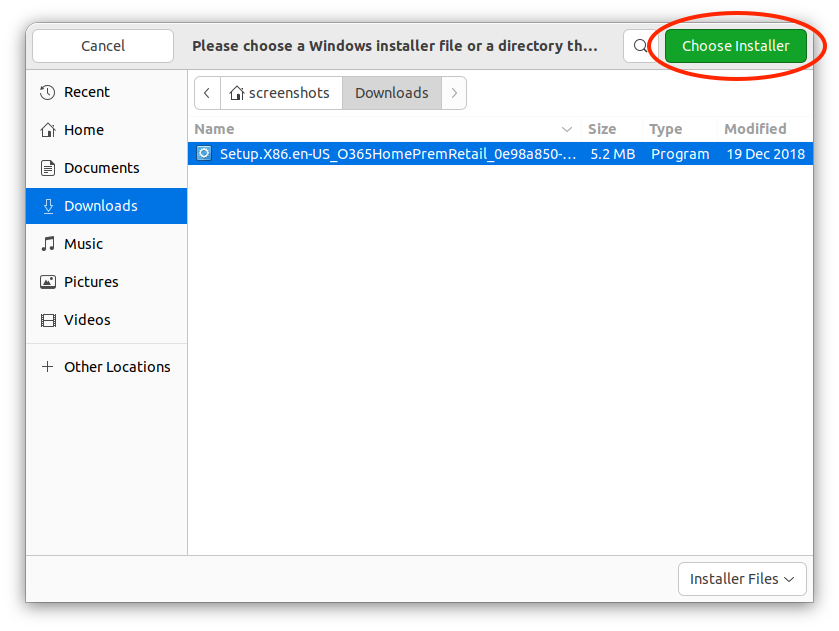
- Click Edit to access your file system.
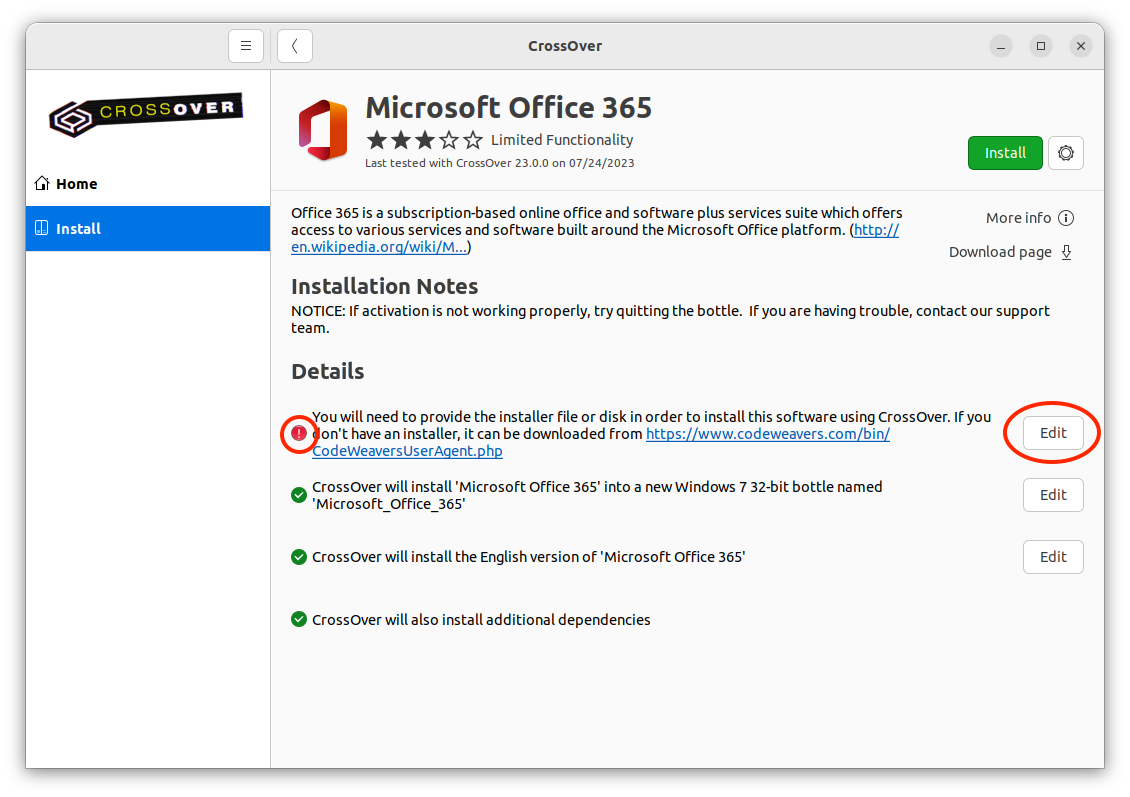
- Navigate to the location of the installer file.
- Select the file and click Choose Installer.
- When CrossOver displays a check mark for each detail, click Install.
Note: You can also use the Edit buttons to override the default selections. Even when CrossOver downloads an installer automatically, you can click Edit to select a different installer that you have downloaded to your machine. You can also click the Edit button next to the bottle information if you wish to install your application into a different bottle type from the one CrossOver automatically selected.
Advanced Options
To access additional install options, click the dropdown menu to the right of Install and select Advanced Options.
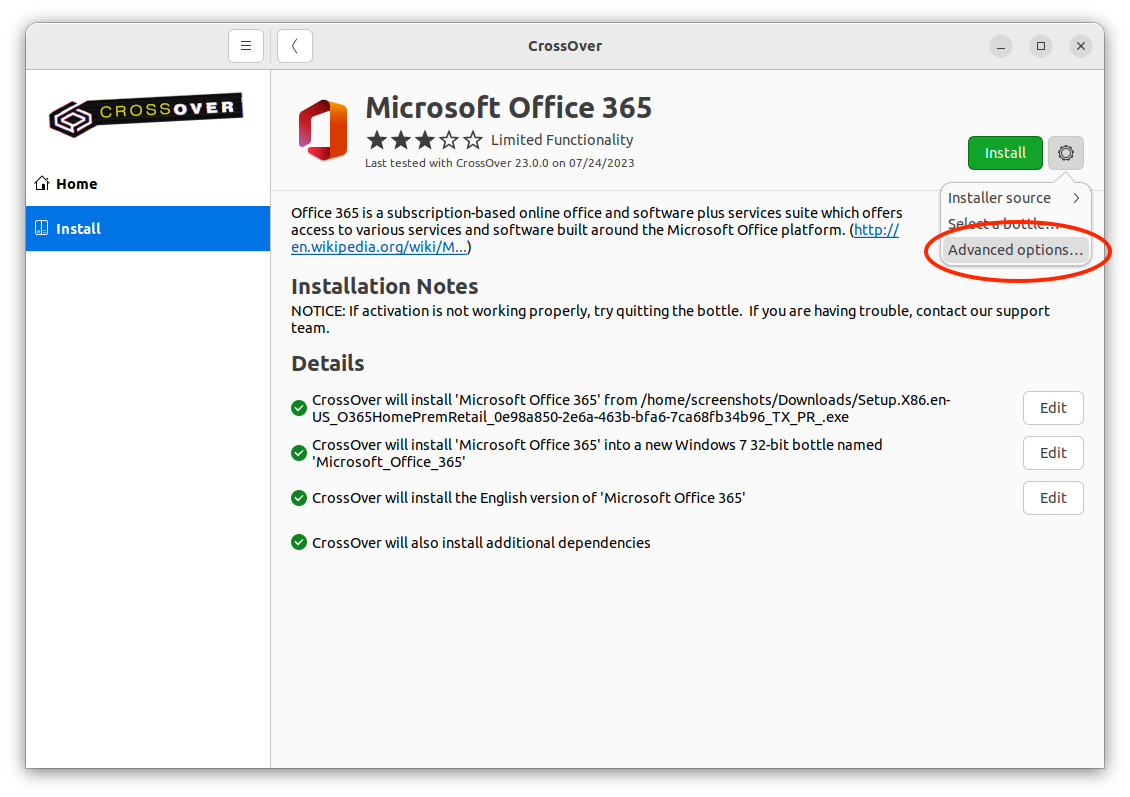
-
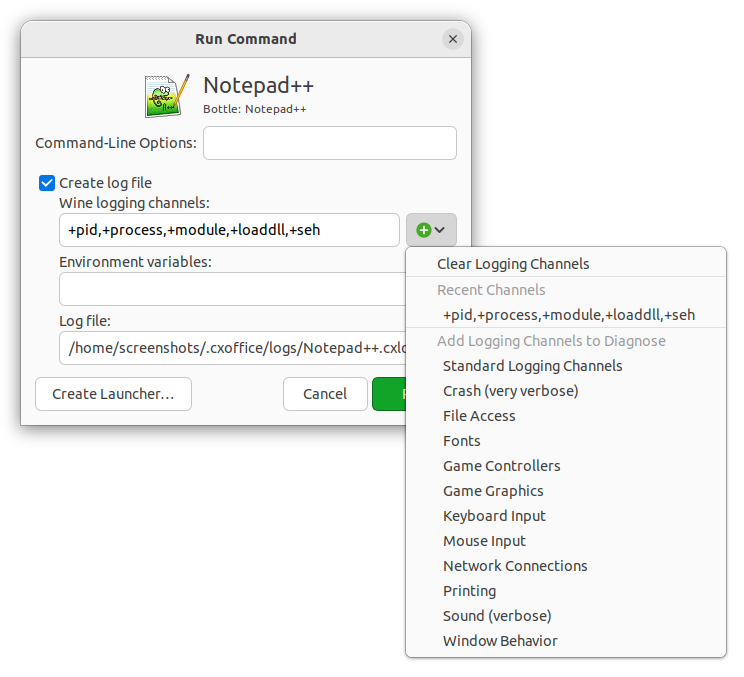
Create log file - To create a debug log during installation of a Windows application, select Create log file. The Wine logging channels field is automatically populated with some of most useful logging channels. You can also manually enter different ones or click the plus sign to select channels from the menu. If you want to change the save location for the log file, update the path in the Log file field. Click Done to return to the Install screen.
-
Application language - If more than one language is available for an application, you can use the dropdown menu to change the language.
- Items to install - Some Windows applications require the installation of additional dependencies to run well with CrossOver. Many of our install profiles select the required dependencies automatically. You can also add dependencies to install by clicking the Add button. To remove dependencies that CrossOver added, click Remove. To undo any changes, click Reset. Click Done to return to the Install screen.

Completing the Install
During installation, Windows software may prompt you for input (e.g., language selection, end-user license agreements). If you believe the install has frozen, look for dialog boxes from the Windows program before clicking Cancel in CrossOver. Canceling the install can result in an unrecoverable problem that requires you to delete the target bottle.
The program you are installing may require input to complete the setup. For example, when Notepad++ is finished installing, you must click Finish.
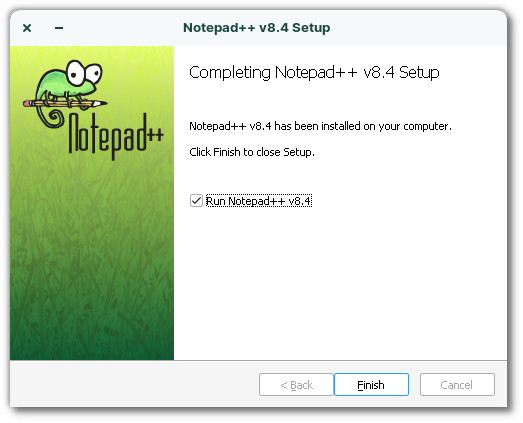
Once the application is installed, CrossOver creates an icon on the Home screen and in the bottle made for the application.
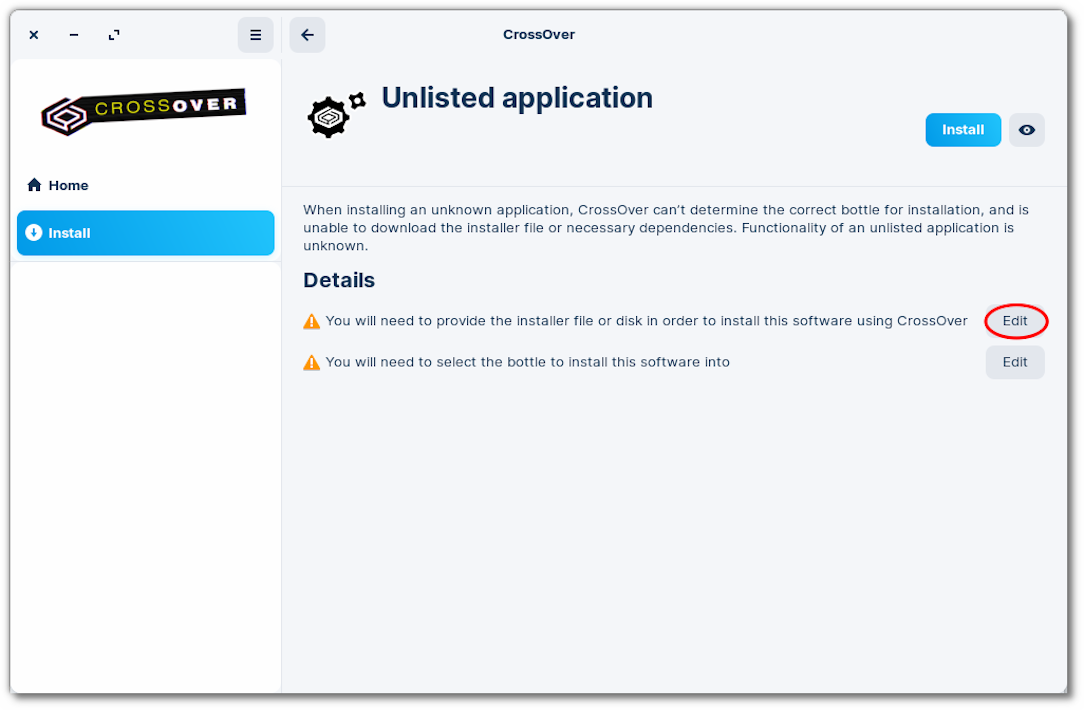
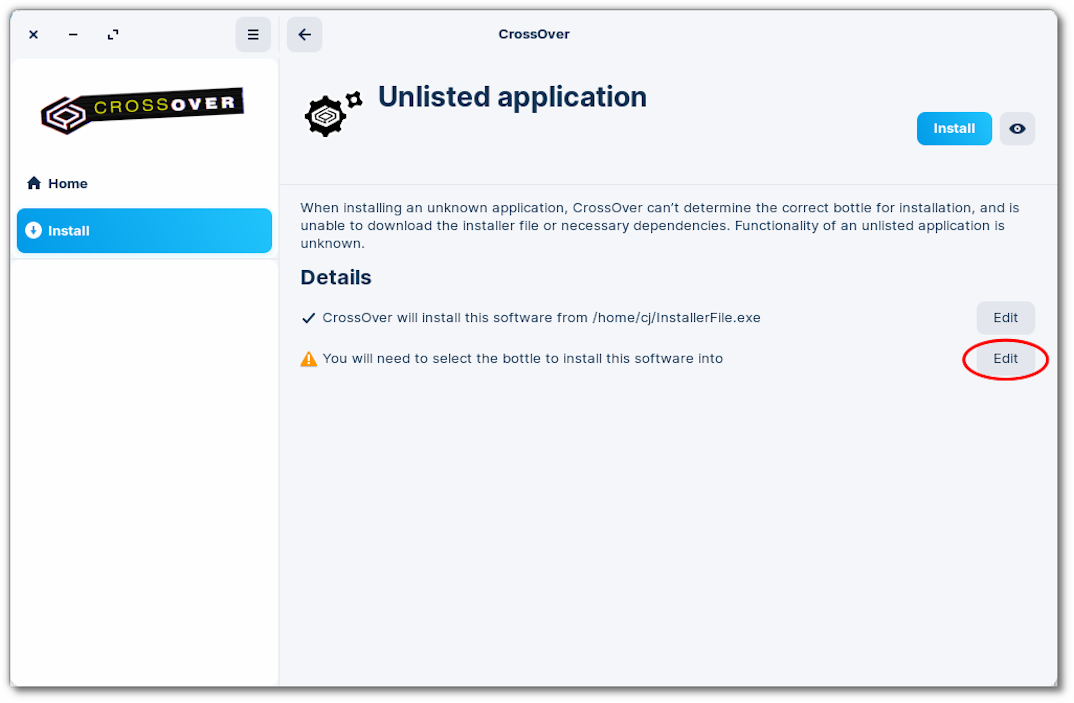
Unlisted Applications
Unlisted applications may not run correctly or at all. Therefore we recommend installing unlisted applications in a separate bottle. Installing an unlisted application into an existing bottle may cause other Windows applications in that bottle to behave incorrectly.
To install an unlisted application, from the Install screen, do the following:
- Click Install an unlisted application.
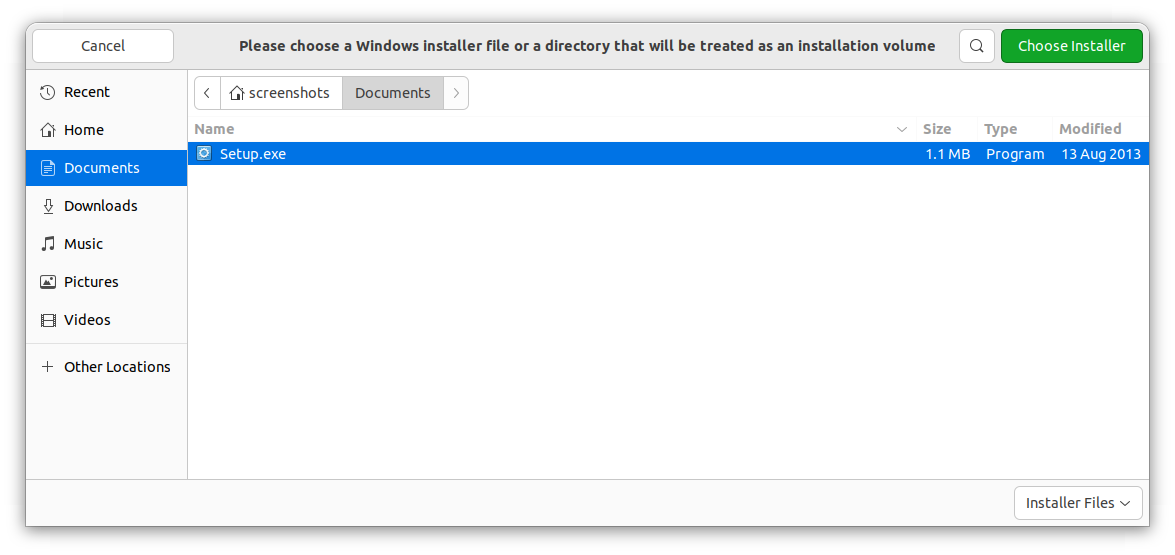
- Click Edit for installer file detail.
- Navigate to the installer file location.
- Select the installer file and click Choose Installer.
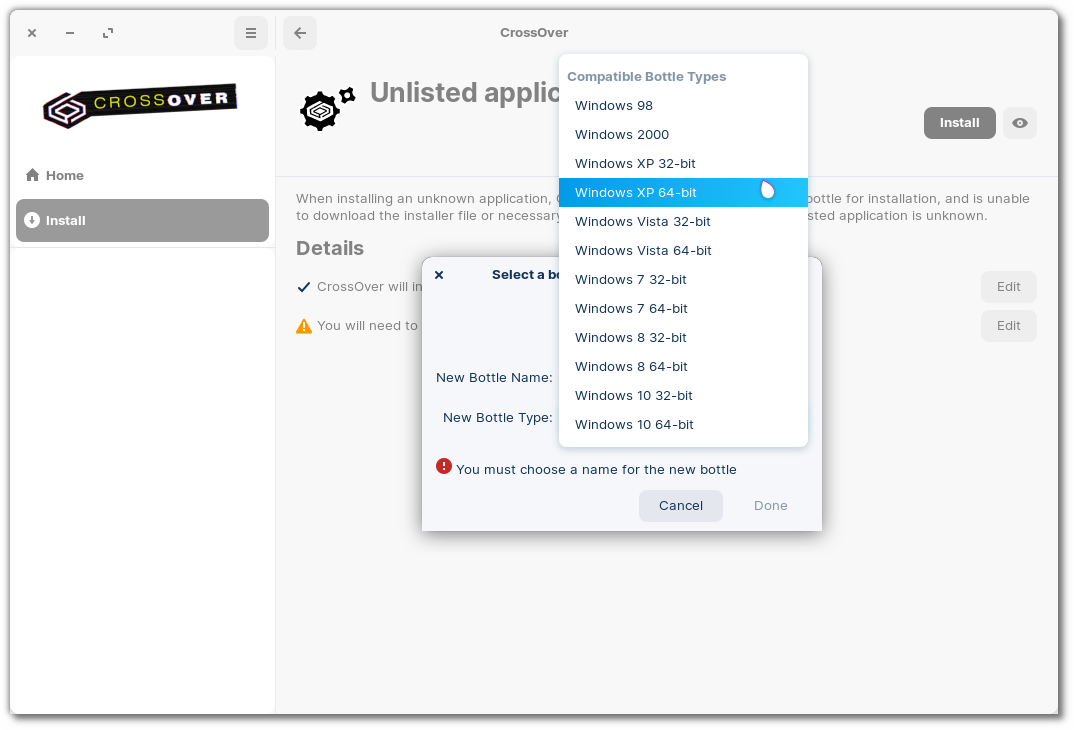
- Click Edit for the bottle install detail.
- Enter a name for the bottle in New Bottle Name.
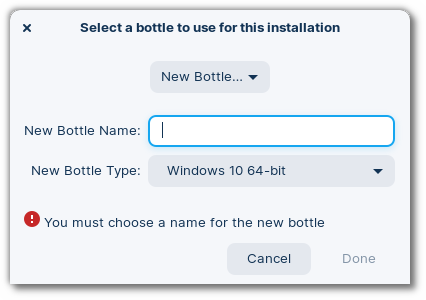
- Select a bottle type from the New Bottle Type menu.
 \
\
Note: If you have difficulty installing an unlisted application, check the CrossOver Compatibility Center.
Applications without installers
Some Windows applications have standalone executables (.exe) that can be run without being installed. These programs can also be run with CrossOver.
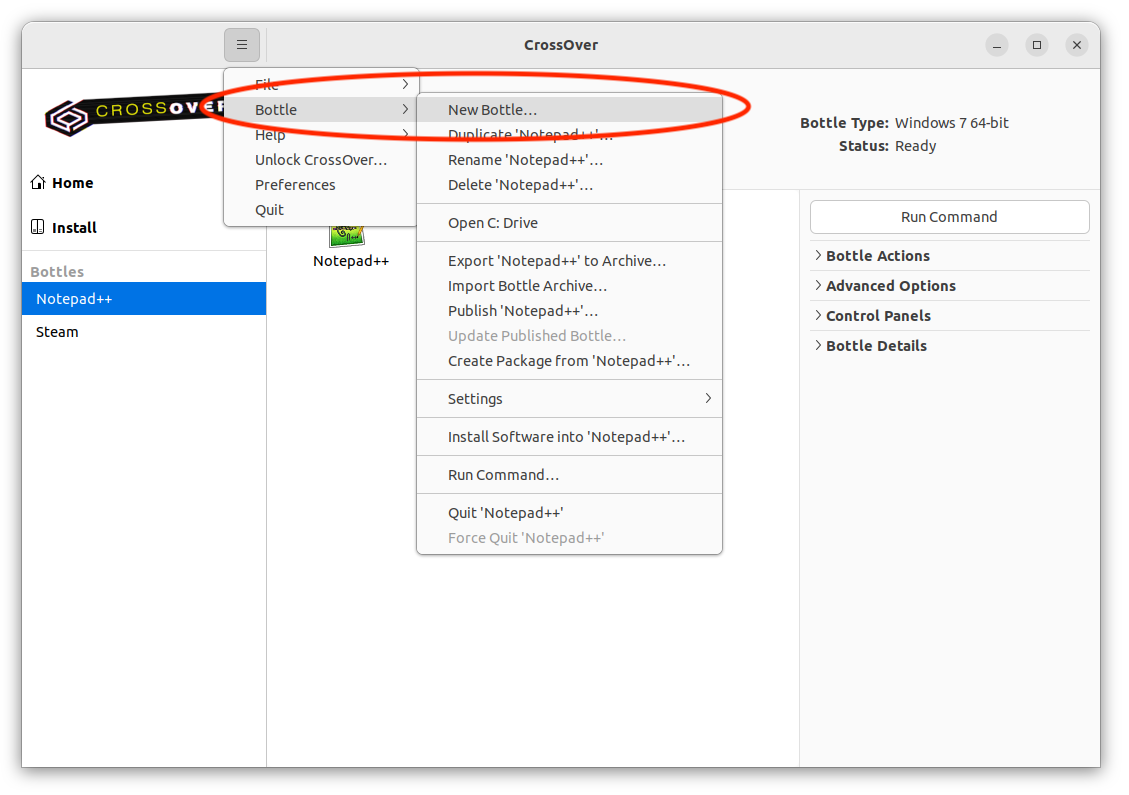
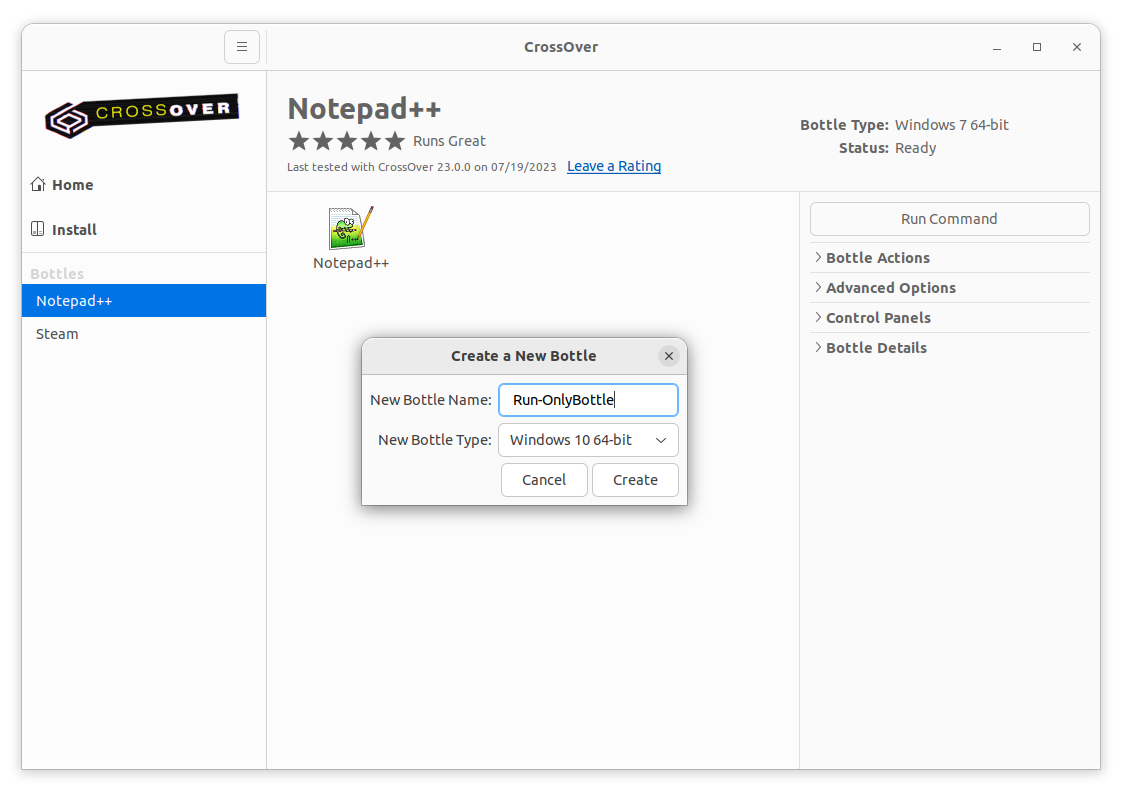
- From the main menu, go to Bottle > New Bottle. Enter a name for the bottle, select a bottle type, and click Create.
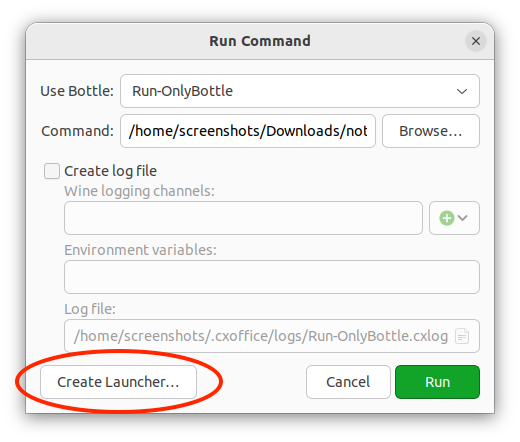
- Select the bottle you just created in the left sidebar, then drag and drop the .exe you want to run into the bottle. Taking this action will open Run Command, and you can simply click Run to launch your application.

- To make it easier in the future to run the application, you can click Create Launcher. This creates a launcher icon for the selected executable in your bottle. If the executable is moved or deleted, this launcher icon will stop working. Make sure the executable is saved somewhere that won’t change.
Running Windows Applications
To launch a Windows application from CrossOver, double-click the application icon. You can do this from the individual bottle view or the Home view.
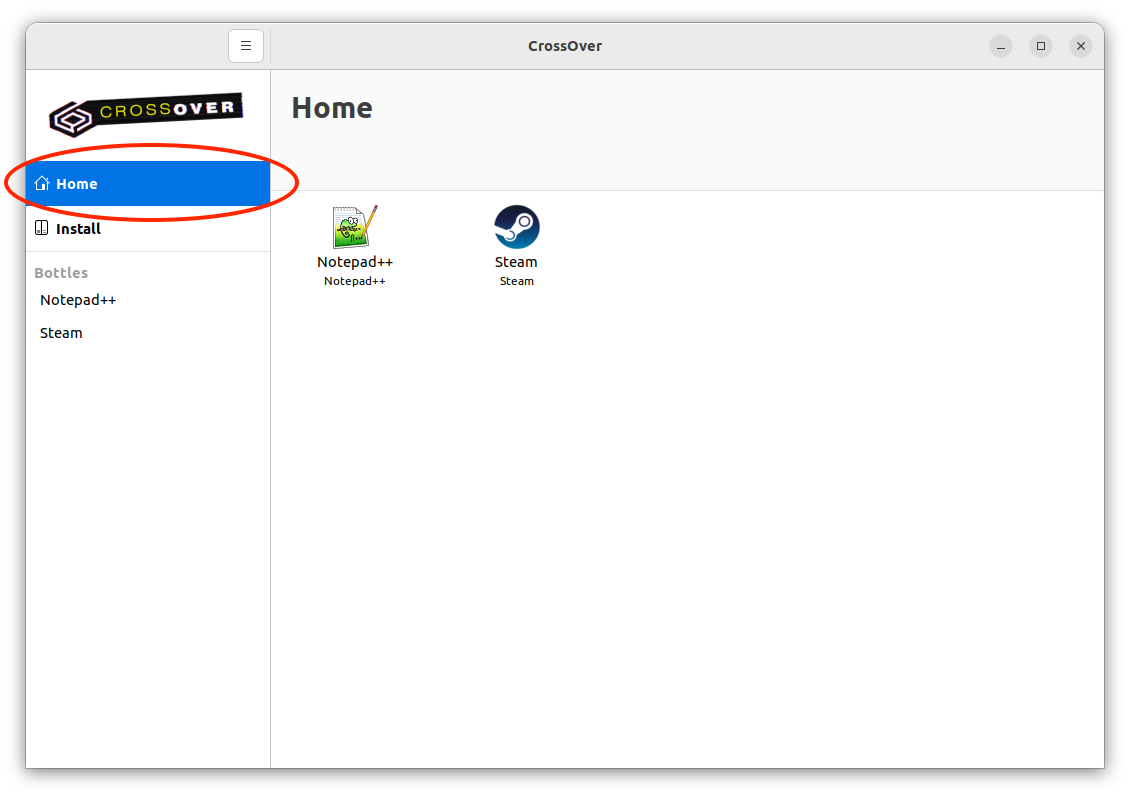
The Home view displays icons for all installed Windows applications. This view can be customized to show only the icons that you want to see. To remove an icon, right-click and select Hide from Home.
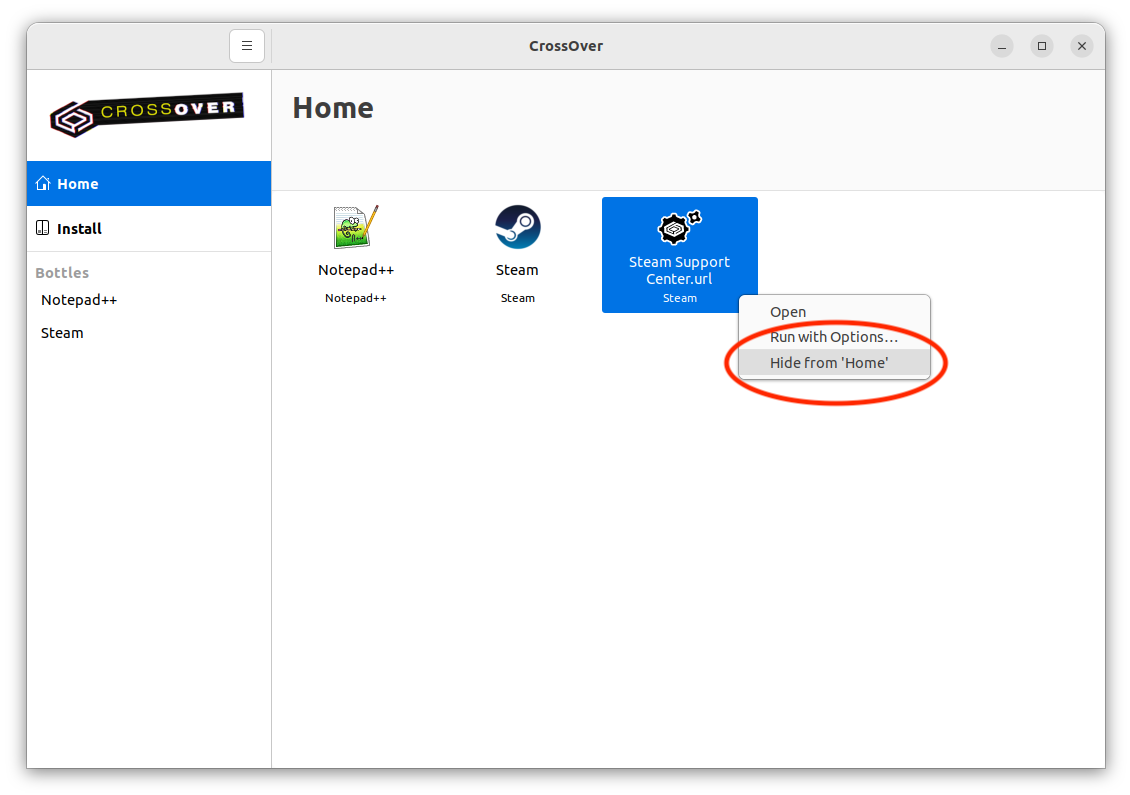
Hiding an icon from the main menu does not delete the application from your disk or impact desktop integration.
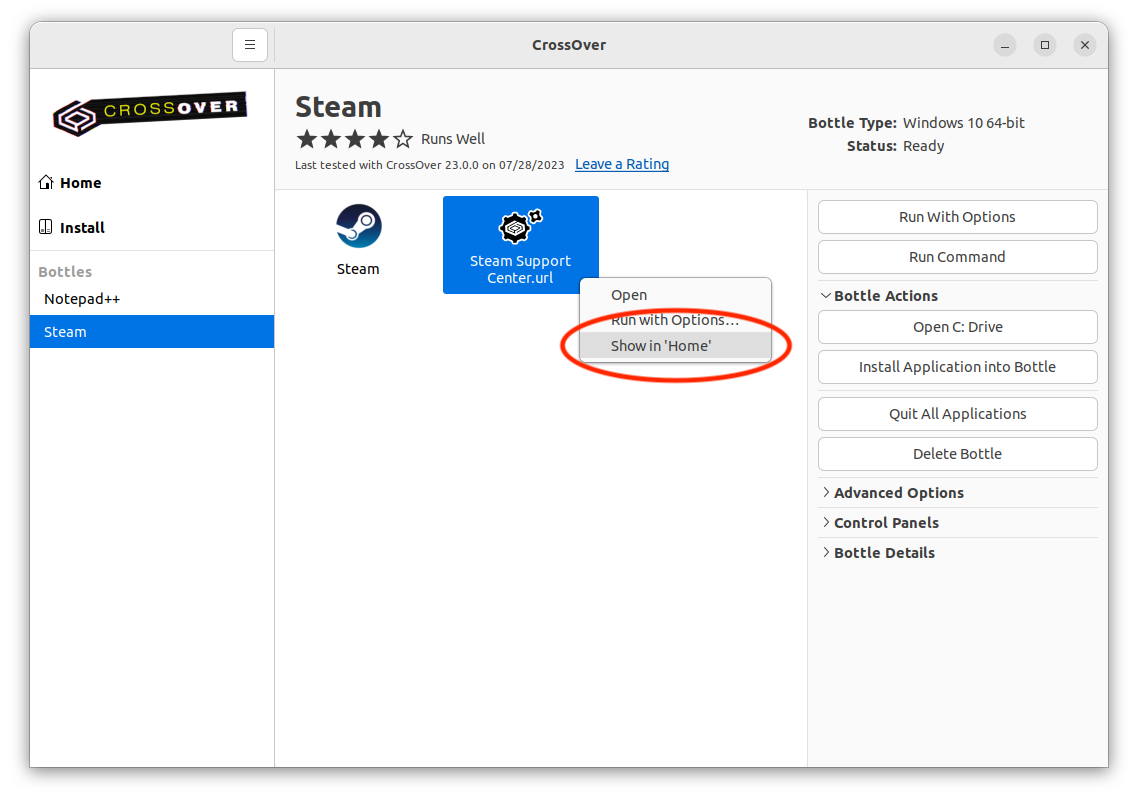
To restore a hidden icon to your Home, select the bottle, right-click the icon and choose Show in Home.
Desktop
CrossOver integrates your Windows applications with your native desktop environment. For example, in hierarchical menu systems such as Xfce, CrossOver creates shortcuts in a menu called Windows Applications. In an environment like GNOME, use your desktop's search function to locate application shortcuts. If you cannot find a shortcut, run applications from CrossOver or use the command line.
Command Line
When you install CrossOver with the .bin package, it creates command-line shortcuts for starting applications in ~/cxoffice/bin. For example, if you installed Office 365, launch Microsoft Word from the command line by running:
$ ~/cxoffice/bin/winwordShortcuts for private bottles are in the directories specified in the PrivateShortcutDirs section of the cxoffice.conf file, while shortcuts for published bottles are in the ManagedShortcutDirs.
If the Windows application allows, you can open documents using the shortcut by specifying the document path as an argument. For instance:
$ ~/cxoffice/bin/winword letter.docTo see the list of available shortcuts, use:
$ grep -l desktopdata/cxmenu ~/cxoffice/bin/*Using the command line to start a program launches the most recently installed version. So, for instance, if you install Word 2013 in one bottle and then install Word 2016 in another, the winword shortcut will start Word 2016.
Using wine --cx-app
To start an application using the --cx-app option, specify the bottle and the name of the executable. For example, Microsoft Word's executable is called winword.exe, so it is run with:
$ /opt/cxoffice/bin/wine --bottle bottle-name --cx-app winword.exeOr, for a single-user install:
$ ~/cxoffice/bin/wine --bottle bottle-name --cx-app winword.exeSimilarly, to open a Word document, run:
$ ~/cxoffice/bin/wine --bottle bottle-name --cx-app winword.exe letter.docFor a complete list of applications that work with the --cx-app command, run this:
$ find "~/.cxoffice" -iname "*.exe"Some .exe files on your system are system tools or subcomponents of other applications, and running them could cause unpredictable or destructive things to happen. Therefore, running a Windows application is never a good idea unless you understand its origins and purpose.
Working with Bottles
CrossOver installs Windows applications into bottles. A bottle contains a C: drive and all its standard folders (e.g., Windows and Program Files), as well as:
- A Windows registry.
- CrossOver settings.
- One or more Windows applications.
- Saved user data.
Unless you specify otherwise, CrossOver installs each application into a new bottle.
Multiple bottles are helpful when a particular application requires otherwise undesirable system settings. It is also possible to maintain bottles that emulate different Windows versions. For instance, an older application may run best in a Windows XP bottle, while a more modern one requires a Windows 10 bottle.
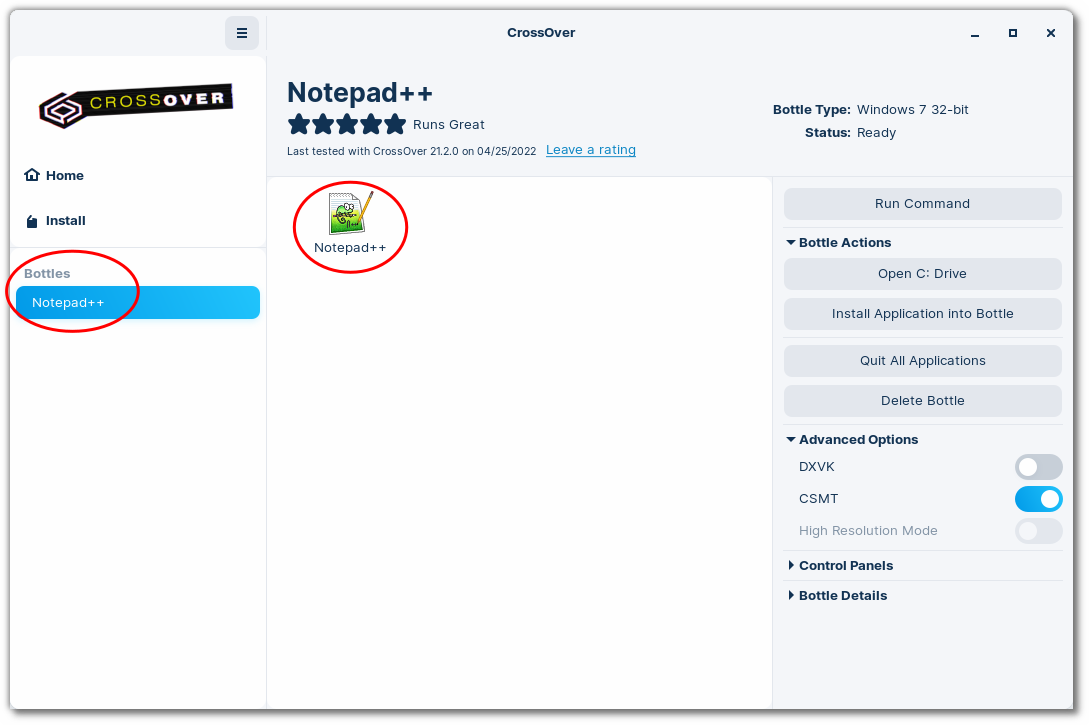
Bottle View
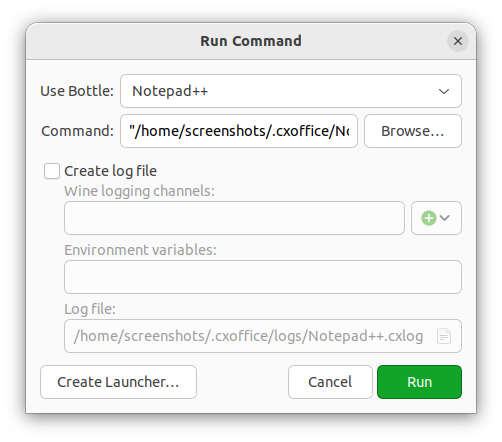
When a bottle is selected, CrossOver displays the Run with Options and Run Command buttons, and the Bottle Actions, Advanced Options, Control Panels, and Bottle Details menus in the right sidebar.
-
Run Command — Access a Windows command prompt in CrossOver to run standard Wine tools (e.g., regedit or notepad) or applications without icons or shortcuts. Click Browse to access the contents of the bottle’s C: drive. You may need to hunt around to find the correct file. An excellent place to start your search is in Program Files. Once you have located and selected the .exe file, click Run. If you need to run the same command regularly, create a shortcut for it by clicking Create Launcher.
-
Run with Options — When an application's icon is selected from a bottle, CrossOver displays Run with Options in the sidebar. Running an application with options is for collecting debug logs, and adding command-line options or environment variables. To enable logging, select Create log file. The Wine logging channels field is automatically populated with some of most useful logging channels. You can also manually enter different ones or click the plus sign to select channels from the menu. If you want to change the save location for the log file, update the path in the Log file field. Click Run to launch the application with logging enabled. Repeat the actions that triggered the original issue in the Windows program. When finished, close the Windows application and the CrossOver Run with Options dialog box.

Bottle Actions
Helpful shortcuts that allow you to manage a bottle's environment in CrossOver.
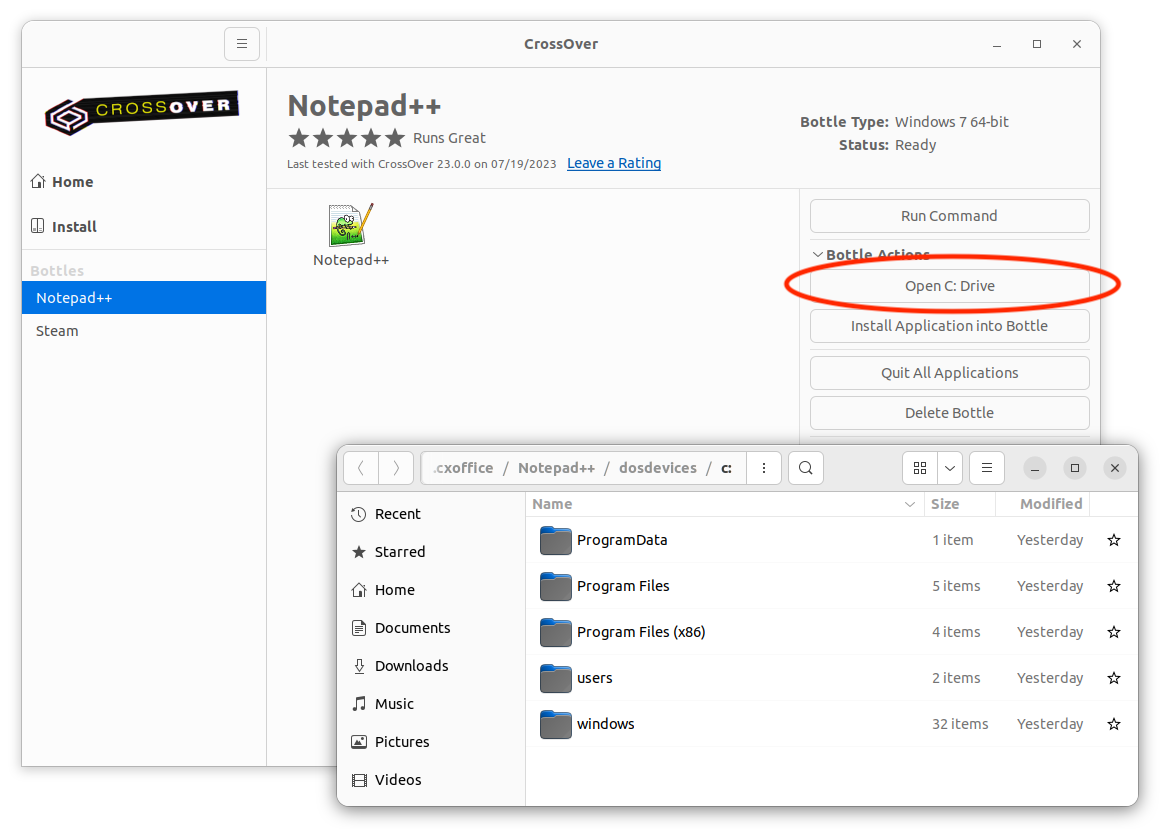
- Open C: Drive — Open the contents of the selected bottle's C: drive in the file manager.
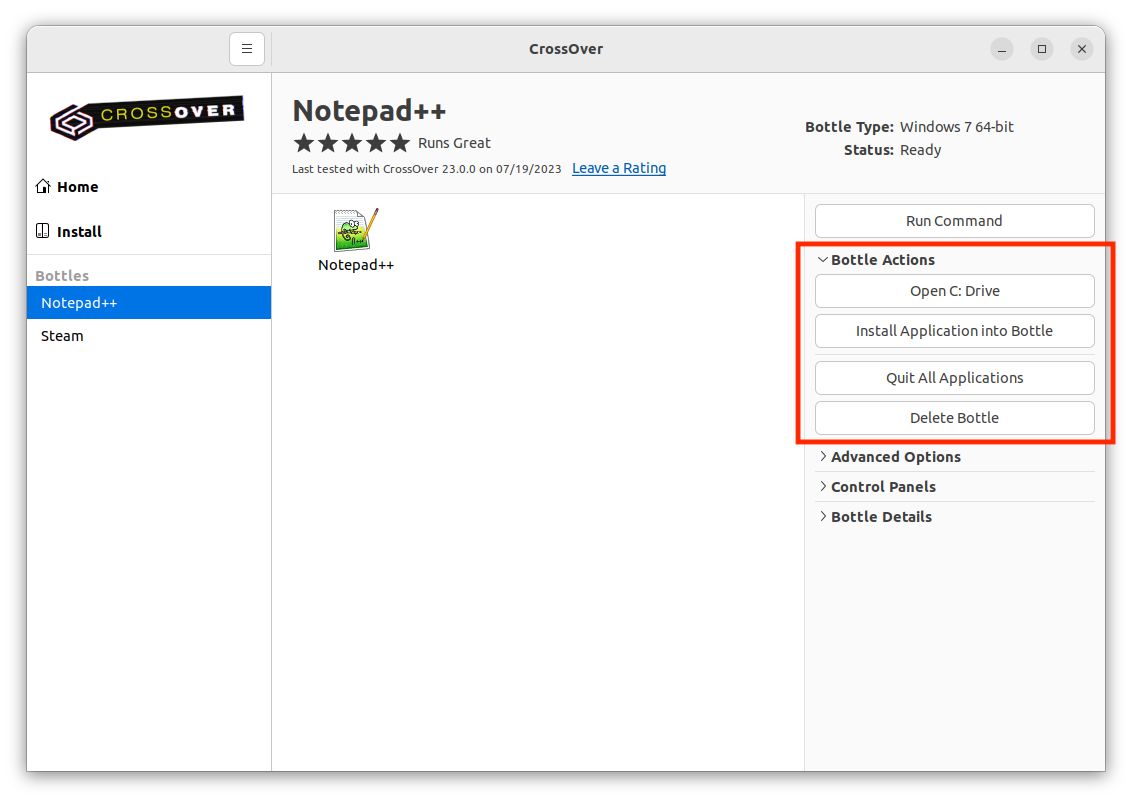
- Install Applications Into Bottle — Install an application into the selected bottle. This option brings you to the Install menu. After selecting an application, the selected bottle will be the default install target.
-
Quit All Applications — Close all applications in the selected bottle. If an application is unstable or not responding and quitting the bottle fails, selecting Quit All Applications stops all processes still running inside the bottle. This may result in lost work if you have unsaved changes. If quitting is not successful, Quit All Applications becomes Force Quit instead.
-
Delete Bottle — Permanently delete the selected bottle. This action cannot be undone.
Advanced Options
-
Auto - When enabled, CrossOver uses the graphics backend specified in its proprietary database on a per-game basis, and uses wined3d if no backend is specified in the database.
-
DXVK — DXVK is a Vulkan-based translation layer for Direct3D 10 and 11. When enabled, DXVK is used instead of the wined3d default. Some games run better with DXVK, while others run better with wined3d.
-
Wine - Wine's known implementation of Direct3D, known as wined3d. When enabled, wined3d is used for all applications installed in the bottle.
- High-Resolution Mode — High-resolution mode switch. When enabled, the DPI in Wine Configuration is set to be the same as the current display DPI. This makes it possible for applications to draw at the correct size on high-DPI displays. Note: Some applications render incorrectly when the DPI is not set to the default value of 96.

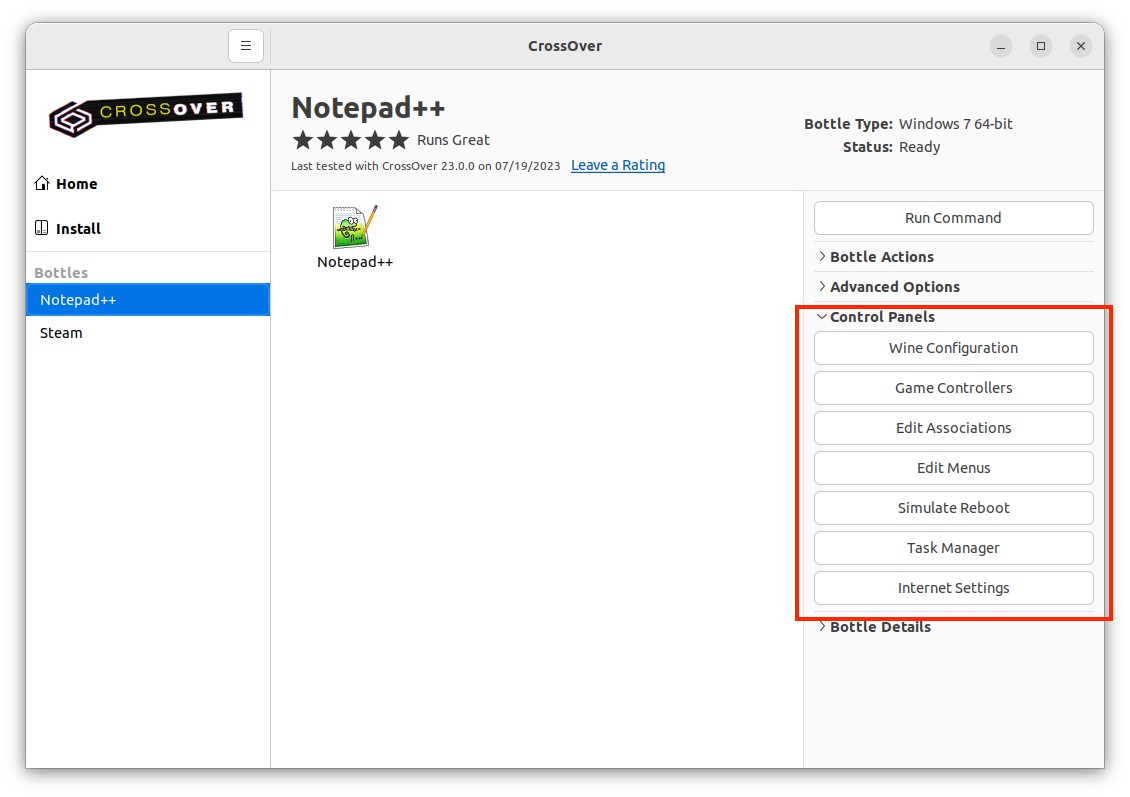
Control Panels
In addition to the tools installed along with Windows applications, CrossOver provides several built-in control panel tools.
System settings should be changed using the configuration tools available on your system because most Windows control panels are unsupported and often don't work as designed.
-
Wine Configuration — Access a range of bottle configuration settings applicable when troubleshooting system integration issues.
-
Game Controllers — Game controller or joystick configuration.
-
Edit Associations — Edit the file-type associations installed by CrossOver. Useful in the event of a conflict between bottles or programs for a particular file type.
-
Edit Menus — Frequently applications install more menu icons than you need. This control panel allows you to disable unneeded icons and simplify your system menus.
-
Simulate Reboot — Replicates a Windows reboot for the selected bottle.
-
Task Manager — Display a list of processes running in the selected bottle. The task manager is helpful when you need to stop specific unresponsive processes.
-
Internet Settings — Network configuration.
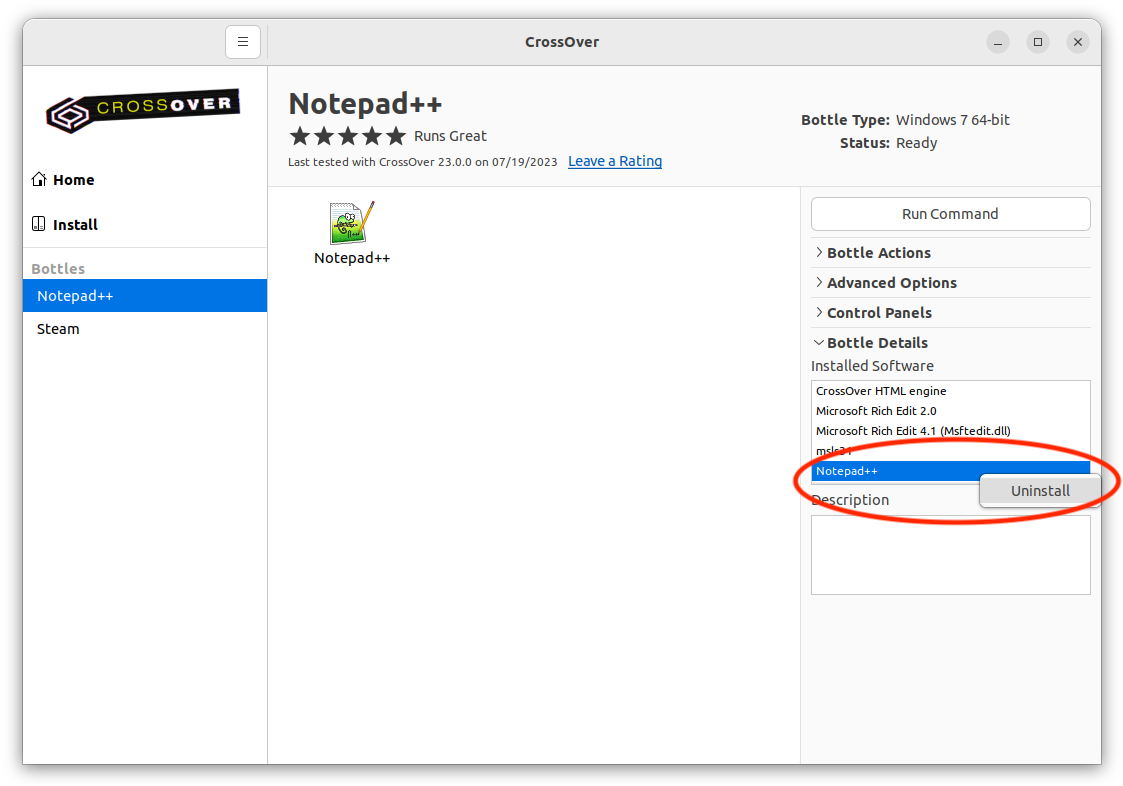
Bottle Details
Shows a list of Windows applications and components in a bottle. There is also a Description field where you can enter notes specific to this bottle.
To uninstall an application from a bottle, right-click on name of the application in the list and select Uninstall. Follow the Windows prompts to uninstall the application.
Note: This action is irreversible. If you delete an application that another application depends on, your entire bottle could stop working.
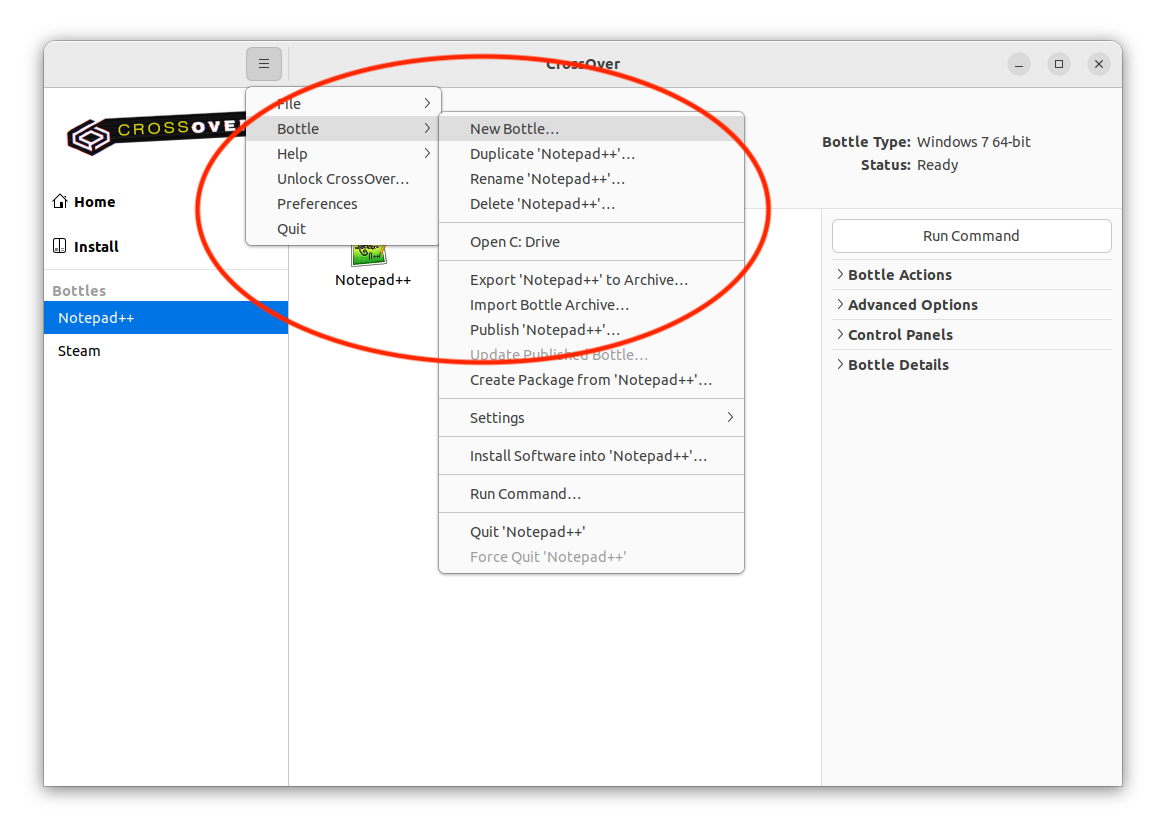
Bottle Commands via Main Menu
Additional bottle commands are available from the Bottle submenu.
-
New Bottle — Creates an empty bottle and allows you to choose the Windows version of the bottle.
-
Duplicate Bottle — Creates an exact copy of the bottle. You can select a new name for the duplicate bottle before it is created.
-
Rename Bottle — Makes the bottle name field editable so a bottle can be renamed.
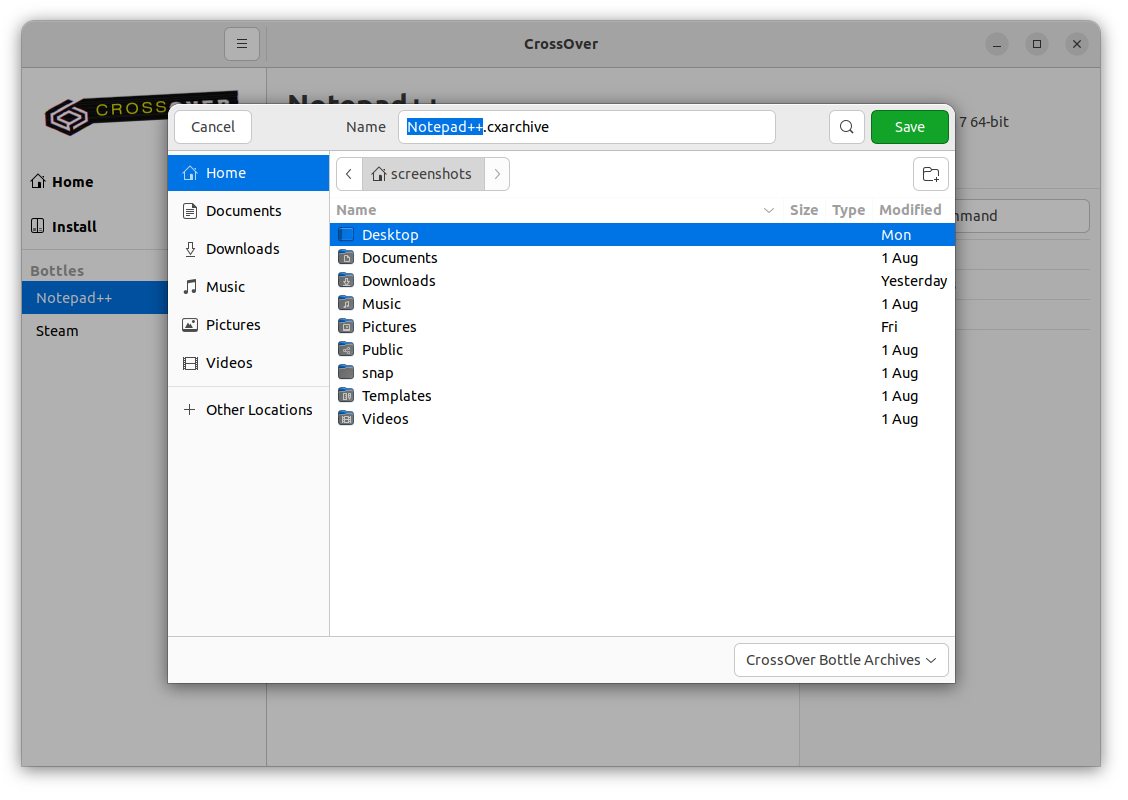
- Export Bottle to Archive — Create a compressed copy of the selected bottle. Select a name and save location for the archive and click Save. The bottle status will change to archiving while the archive is being created, and the bottle will be unusable until the archive is complete. We recommend creating a bottle archive before installing new software or modifying bottle settings in case you need to revert the bottle to a previous state. Bottle archives can also be used to move a bottle to a new machine.
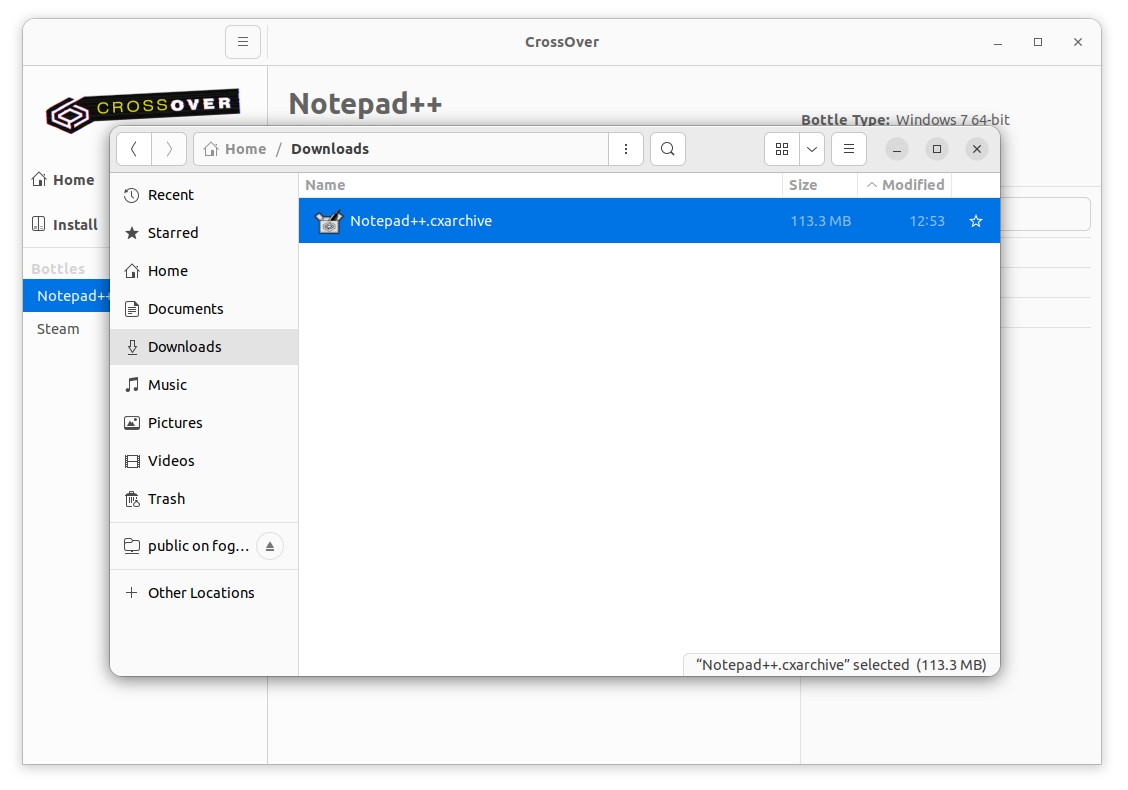
-
Import Bottle Archive — Restore an archived bottle. Navigate to the location of the
.cxarchivefile you want to restore, select it and click Restore. Your imported bottle will appear in the left sidebar.

-
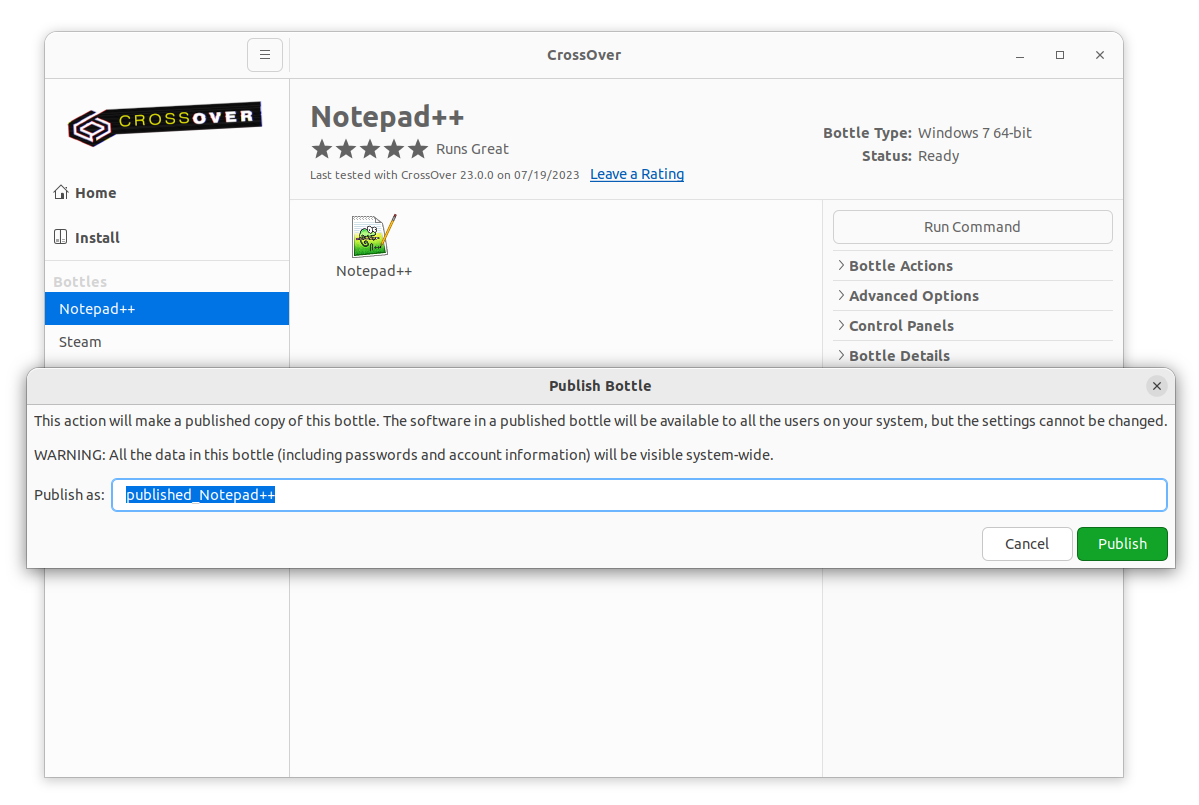
Publish Bottle — Publish a copy of the selected bottle. This allows all users of your system have access to the bottle’s applications and data. Bottles are private when first created. Private bottles are accessible only to the user who created them via that user's home folder. Note: CrossOver stores published bottles in a public directory (
~/cxoffice).

-
Update Published Bottle — Update a published bottle. Changes made to a published bottle are unavailable to other users until the published bottle is updated.
Preferences
Preferences are stored separately for each user, so changing your preferences will not impact anyone else on the system. To update CrossOver preferences, from the main menu select Preferences.


Online Integration
-
Installation Recipes — Installation recipes are known settings and dependencies that work for an application. This option automatically updates CrossOver with new recipes from the CodeWeavers website.
-
CrossOver Updates — Occasionally, between major releases, CrossOver is updated. Select this option and CrossOver automatically checks for updates.
- Submitting Ratings — When this option is selected, CrossOver reminds you to submit ratings for installed applications. Ratings help us improve future versions of CrossOver and inform other users how well applications work with CrossOver.
Bottles
-
Select the default bottle location — To change the location CrossOver stores bottles, click Select and choose a new location. Be careful changing this to a folder on a folder on an external drive: using a different filesystem can result in broken bottles. To revert back to the default location, click Reset.
-
Enable deprecated 32-bit bottles — By default, CrossOver 26 creates new bottles as 64-bit. Your 32-bit Windows applications will still run inside these 64-bit bottles. You only need to enable this option if you already tried a 64-bit bottle and your application stopped working. This option will be removed in CrossOver 27, so be sure to submit a ticket!
Installer Assistant
-
Include Entries for Untested and Known-Not-To-Work Software — By default, CrossOver will display entries for all applications. You can toggle this setting off to hide all one-star, two-star, and unrated applications.
-
Install Recommended Linux Packages — CrossOver needs many Linux libraries to run Windows applications. When this option is checked, CrossOver automatically installs missing libraries.
-
Downloaded Installers — When CrossOver obtains an installer file during the install process, it keeps a copy of that file for future installs. If you need free disk space or are experiencing issues reinstalling software, click Clear to remove cached files. Installer files are located in the
.cxoffice/installersdirectory.
User Interface
-
Use Default Window Decorations — When enabled CrossOver will use standard window manager controls to draw its menu bar instead of displaying a single-button hamburger menu.
CrossOver Support
If you need further assistance please search our support library, search our Compatibility Center, or contact our technical support team.
CrossOver is a trademark of CodeWeavers, Inc. Linux is a registered trademark of Linus Torvalds. Windows is a registered trademark of Microsoft Corporation. All other trademarks and registered trademarks are owned by their respective companies.